These docs are only slightly modified (spelling, and took out information about some standard python features)
Control #
Wait
Wait #
Waits for a specific amount of time before moving to the next command.
wait(TIME, SECONDS)How To Use #
Set an amount of time in SECONDS to have your program wait before executing subsequent commands.
wait(10, SECONDS)Drivetrain #
Drivetrain Calibrate
Drivetrain Calibrate #
Calibrates the Drivetrain's Inertial, GPS, or 3-Wire Gyro Sensor based on which device is currently configured with the Drivetrain.
calibrate_drivetrain()How To Use #
The Drivetrain Calibrate command will calibrate the Drivetrain's Inertial, GPS, or 3-Wire Gyro Sensor. The Drivetrain must remain stationary during the calibration process.
Drive
Drive #
Moves the Drivetrain forever in the direction specified inside the parentheses.
All drivetrain motors run forward or in reverse at the velocity set using the drivetrain.set_drive_velocity command. The default velocity is 50%.
Negative values will cause the Drivetrain to drive forward with a REVERSE input and in reverse with a FORWARD input.
drivetrain.drive(DIRECTION)How To Use #
The drivetrain.drive command will run the Drivetrain forever, until a new drivetrain command is used, or the program is stopped.
Examples #
Use the FORWARD argument in all-capital letters to move the Drivetrain forward.
drivetrain.drive(FORWARD)Use the REVERSE argument in all-capital letters to move the Drivetrain in reverse.
drivetrain.drive(REVERSE)Drive For
Drive For #
Moves the Drivetrain for a given distance. All drivetrain motors run forward or in reverse at the velocity set by the drivetrain.set_drive_velocity command. After the Drivetrain has moved the input distance the Drivetrain will stop.
drivetrain.drive_for(DIRECTION, DISTANCE, UNITS)How To Use #
Set how far the Drivetrain will move by entering at least three valid arguments inside of the parentheses, separated by commas.
The first argument specifies the direction. Valid inputs are either FORWARD or REVERSE in all capital letters.
The second argument specifies the distance that the V5 Robot should drive.
The third argument specifies the unit of measurement that should be used. Valid inputs are either INCHES or MM (millimeters) in all-capital letters.
The DISTANCE parameter accepts numeric values. Negative values will cause the V5 Robot to drive in the opposite of the input DIRECTION.
drivetrain.drive_for(REVERSE, 5.0, INCHES)
The drive_for command is by default a blocking command. It will prevent subsequent commands from executing until the Drivetrain movement has completed.
Optional Parameter #
You can set a fourth parameter to wait=False to allow proceeding commands to run even before the Drivetrain is done moving.
drivetrain.drive_for(FORWARD, 200, MM, wait=False)Example #
This example shows the drivetrain.drive_for being used with a variable as a distance.
The V5 Robot will drive 200 MM forward.
distance_variable = 200

drivetrain.drive_for(FORWARD, distance_variable, MM)
Set Drive Velocity
Set Drive Velocity #
Sets the velocity of the Drivetrain for drive and drive_for commands.
drivetrain.set_drive_velocity(VELOCITY, UNITS)How To Use #
drivetrain.set_drive_velocity will set the Drivetrain's velocity when used with a drive or drive_for command. It will not cause the Drivetrain to move when used by itself.
drivetrain.set_drive_velocity accepts a range of values depending on what units are passed as the second parameter.
If PERCENT is used as the second parameter, VELOCITY accepts a range from -100 to 100.
drivetrain.set_drive_velocity can also use RPM as a valid UNITS parameter. drivetrain.set_drive_velocity will accept a "rotations per minute" (RPM) value between -200 and 200.
Setting a Drivetrain's drive velocity to a negative value will cause the Drivetrain to drive opposite of the DIRECTION passed into a drive or drive_for command.
Setting a Drivetrain's drive velocity to 0 will prevent the Drivetrain from moving even if a drive or drive_for command is used.
Example #
This example shows that the Drivetrain will go in reverse due to a negative value.
drivetrain.set_drive_velocity(-100, PERCENT)
drivetrain.drive(FORWARD)
This example will prevent the Drivetrain from moving.
drivetrain.set_drive_velocity(0, PERCENT)
drivetrain.drive(FORWARD)
Set Heading
Set Heading #
Sets the Gyro of the Drivetrain to an exact heading.
drivetrain.set_heading(HEADING, UNITS)How To Use #
The drivetrain.set_heading command can be used to set the Drivetrain's position to any given heading. This command can be used to reset the orientation of the Drivetrain's Gyro when the heading is set to a value of 0.
drivetrain.set_heading accepts a number value between 0 and 360 as it's first argument, and DEGREES written in all-capital letters as it's second argument.
Example #
This example sets the Drivetrain heading to 90 degrees.
Since the heading of the V5 Robot is set to 90 degrees, the subsequent turn_to_heading command will not cause the robot to turn as its current heading has already been set to 90 degrees.
drivetrain.set_heading(90, DEGREES)
drivetrain.turn_to_heading(90, DEGREES)
Set Rotation
Set Rotation #
Sets the drivetrain's angle of rotation with a Gyro Sensor.
drivetrain.set_rotation(ROTATION, UNITS)How To Use #
The drivetrain.set_rotation command can be used to set the Drivetrain's angle of rotation to any given positive or negative value.
The ROTATION parameter can accept numeric values.
The ROTATION parameter does not have a limit of 0-359 degrees.
Example #
This example will turn the robot a total of 210 degrees:
drivetrain.turn_to_rotation(120, DEGREES)
drivetrain.set_rotation(-45, DEGREES)
drivetrain.turn_to_rotation(45, DEGREES)- Turn right (clockwise) to rotation 120 degrees.
- Set the robot's current position as rotation of -45 degrees.
- Turn right (clockwise) an additional 90 degrees (-45 degrees to +45 degrees) based on the set rotation value from the previous command.
Set Stopping
Set Stopping #
drivetrain.set_stopping(MODE)How to Use #
Replace the MODE parameter with one of the following options:
- BRAKE: will cause the Drivetrain to come to an immediate stop.
- COAST: lets the Drivetrain slow gradually to a stop.
- HOLD: will cause the Drivetrain to come to an immediate stop, and returns it to its stopped position if moved.
The brake mode applied by the drivetrain.set_stopping() command will be used for subsequent Drivetrain commands in the program unless otherwise changed.
Example #
This example shows the robot driving forward for 200 MM before coasting to a stop.
drivetrain.set_stopping(COAST)
drivetrain.drive_for(FORWARD, 200, MM)
Set Timeout
Set Timeout #
Sets a time limit for the Drivetrain movement commands.
drivetrain.set_timeout(TIME, SECONDS)How to Use #
The command is used to prevent movement commands that do not reach their position from preventing other proceeding commands from running.
Specify the amount of time in SECONDS.
Example #
The example below sets the timeout of the Drivetrain to 3 seconds.
drivetrain.set_timeout(3, SECONDS)
drivetrain.drive_for(FORWARD, 1000, MM)
Set Turn Velocity
Set Turn Velocity #
Sets the Drivetrain's turn velocity.
drivetrain.set_turn_velocity(VELOCITY, UNITS)How To Use #
drivetrain.set_turn_velocity will set the velocity of the Drivetrain when turning, but will not cause the Drivetrain to move when used without a turn or turn_for command.
drivetrain.set_turn_velocity accepts a range of values depending on what units are passed as the second parameter.
If PERCENT is used as the second parameter, VELOCITY accepts a range from -100 to 100.
Alternatively, drivetrain.set_turn_velocity can also use RPM as a valid UNITS parameter. drivetrain.set_turn_velocity will accept a "rotations per minute" (RPM) value between -200 and 200.
Setting a Drivetrain's turn velocity to a negative value will cause the Drivetrain to turn in the opposite of the direction passed into any following turn commands.
Setting a Drivetrain's turn velocity to 0 will prevent the Drivetrain from turning, even when using a turn or turn_for command.
Example #
In this example, the Drivetrain will turn in the opposite direction (LEFT) due to a negative value.
drivetrain.set_turn_velocity(-100, PERCENT)
drivetrain.turn(RIGHT)
Stop
Stop #
Stops the Drivetrain.
drivetrain.stop()How To Use #
The drivetrain.stop() command stops the Drivetrain. It does not take any arguments in its parentheses.
Example #
This example will stop the Drivetrain after the V5 Robot has driven forward for 3 seconds.
drivetrain.drive(FORWARD)
wait(3, SECONDS)
drivetrain.stop()
Turn
Turn #
Turns the Drivetrain to the right or left.
drivetrain.turn(DIRECTION)How To Use #
The drivetrain.turn command will rotate the Drivetrain in the given direction forever until a new drivetrain command is used, or until the program is stopped.
Use the LEFT argument in all-capital letters to turn the Drivetrain to the left.
drivetrain.turn(LEFT)Use the RIGHT argument in all-capital letters to turn the Drivetrain to the right.
drivetrain.turn(RIGHT)Example #
In this example, the robot will drive forward 200 MM before turning right indefinitely.
drivetrain.drive_for(FORWARD, 200, MM)

drivetrain.turn(RIGHT)
Turn For
Turn For #
Turns the Drivetrain for a specified number of degrees.
drivetrain.turn_for(DIRECTION, ANGLE, UNITS)How To Use #
The first argument specifies the turn direction: LEFT or RIGHT, written in all-capital letters.
The second argument specifies the turn angle as a numeric value; this can be any number between 0 and 360.
The third argument is the turn units. This should be set as DEGREES in all-capital letters.
The turn_for command is by default a blocking command. It prevents any proceeding code from executing until the Drivetrain has completed its turn.
Optional Parameters #
If the fourth argument is set to wait=False, proceeding commands will be allowed to execute even before the Drivetrain has completed its turn.
drivetrain.turn_for(LEFT, 90, DEGREES, wait=False)Example #
This example will turn the V5 Robot 270 degrees to the right.
drivetrain.turn_for(RIGHT, 270, DEGREES)Turn To Heading
Turn To Heading #
Turns the Drivetrain to a specific heading when using the Gyro or Inertial sensors.
drivetrain.turn_to_heading(HEADING, UNITS)
How To Use #
The drivetrain.turn_to_heading command can be used to turn the Drivetrain to any given clockwise heading.
Based on the current Gyro heading, drivetrain.turn_to_heading will determine which direction to turn.
The HEADING parameter accepts numeric values in the range of 0.00 to 359.99 .
The UNITS parameter should be set to DEGREES.
Example #
This example will cause the Drivetrain to make four turns:
drivetrain.turn_to_heading(45.0, DEGREES)
drivetrain.turn_to_heading(90.0, DEGREES)
drivetrain.turn_to_heading(270.0, DEGREES)
drivetrain.turn_to_heading(180.0, DEGREES)- Right to 45 degrees
- Right to 90 degrees
- Right to 270 degrees
- Left to 180 degrees
The turn_to_heading command will by default block proceeding commands until the Drivetrain turn has completed.
Optional Parameters #
You can set wait=False as a third parameter to prevent the turn_to_heading command from blocking proceeding commands from executing until the Drivetrain turn has completed.
drivetrain.turn_to_heading(180.0, DEGREES, wait=False)Turn To Rotation
Turn To Rotation #
Turns the Drivetrain to a specific angle of rotation.
drivetrain.turn_to_rotation(ROTATION, DEGREES)
How To Use #
The drivetrain.turn_to_rotation command can be used to turn the Drivetrain to a given positive (clockwise) or negative (counter-clockwise) value.
Based on the current rotation of the Drivetrain, drivetrain.turn_to_rotation will determine which direction to turn.
The ROTATION parameter can accept numeric values.
Numeric values are not limited to the range of 0 - 359.99 degrees. Turns will be absolute and may cause the robot to rotate more than once if necessary.
Example #
This example will cause the Drivetrain to make four turns:
drivetrain.turn_to_rotation(90.0, DEGREES)
drivetrain.turn_to_rotation(180, DEGREES)
drivetrain.turn_to_rotation(-45, DEGREES)
drivetrain.turn_to_rotation(0, DEGREES)- Right (clockwise) to 90 degrees
- Right (clockwise) to 180 degrees
- Left (counter-clockwise) to -45 degrees
- Right (clockwise) to 0 degrees
The drivetrain.turn_to_rotationcommand will by default block proceeding commands until the Drivetrain turn has completed.
Optional Parameter #
You can set a third parameter to wait=False to prevent the turn_to_rotation command from blocking proceeding commands until the Drivetrain turn is completed.
drivetrain.turn_to_rotation(180.0, DEGREES, wait=False)Events #
Event Register Callback
Event Register Callback #
Register a callback function to run when an event is triggered.
event(callback)How To Use #
Register a callback to a user-defined event.
def run_on_broadcast():
    brain.screen.set_cursor(1, 1)
    brain.screen.print("my_event triggered run_on_broadcast callback")

# Create a new event.
my_event = Event()

# Register a callback function to the myEvent event.
# Wait to allow events to register
my_event(run_on_broadcast)
wait(15, MSEC)

# Broadcast the event.
my_event.broadcast()
Brain Screen Pressed
Brain Screen Pressed #
Runs the callback function when the V5 Brain’s touchscreen is pressed.
brain.screen.pressed(callback)How To Use #
The brain.screen.pressed() command can be used to trigger actions or behaviors based on touch interaction with the V5 Brain's touchscreen.
Used together with the brain.screen.x_position() and brain.screen.y_position() commands, users can create custom interfaces to their V5 Brain by detecting when and where touches occur on the screen.
You will need to create a function to call when the screen gets pressed. Provide the name of the function that should run when the event occurs as the callback parameter.
# Function to run when the event occurs
def run_on_event():
    brain.screen.print("Event has occurred")

# Register event with a callback function
brain.screen.pressed(run_on_event)
Brain Screen Released
Brain Screen Released #
Runs the callback function when the V5 Brain’s touchscreen is released.
brain.screen.released(callback)How To Use #
The brain.screen.released() command can be used to trigger actions or behaviors based on touch interaction with the V5 Brain's touchscreen.
Used together with the brain.screen.x_position() and brain.screen.y_position() commands, users can create custom interfaces to their V5 Brain by detecting when and where touches occur on the screen.
You will need to create a function to call when the screen gets released. Provide the name of the function that should run when the event occurs as the callback parameter.
# Function to run when the event occurs
def run_on_event():
    brain.screen.print("Event has occurred")

# Register event with a callback function
brain.screen.released(run_on_event)
Brain Timer Event
Brain Timer Event #
Runs the specified callback function when the V5 Brain's timer is greater than the given value.
brain.timer.event(callback, 1000)How To Use #
The V5 Brain's timer begins at the beginning of each project.
Specify the amount of time. The brain.timer.event() event will run once the V5 Brain's timer is greater than the entered amount.
The brain.timer.event() command can accept integer values for the number of milliseconds.
You will need to create a function to call when the timer is greater than the entered amount. Provide the name of the function that should run when the event occurs as the callback parameter.
# Function to run when the event occurs
def run_on_event():
    brain.screen.print("Event has occurred")

# Register event with a callback function
brain.timer.event(run_on_event, 2000)
Bumper Pressed
Bumper Pressed #
Runs the specified function when the bumper is pressed.
bumper.pressed(callback)How To Use #
You will need to create a function to call when the Bumper Sensor is pressed.
Provide the name of the function that should run when the event occurs as the callback parameter.
# Function to run when the event occurs
def run_on_bumper_pressed():
    brain.screen.print("Bumper pressed!")

# Register event with a callback function
bumper_a.pressed(run_on_bumper_pressed)
Bumper Released
Bumper Released #
Runs the specified function when the bumper is released.
bumper.released(callback)How To Use #
You will need to create a function to call when the Bumper Sensor is released.
Provide the name of the function that should run when the event occurs as the callback parameter.
# Function to run when the event occurs
def run_on_bumper_released():
    brain.screen.print("Bumper released!")

# Register event with a callback function
bumper_a.released(run_on_bumper_released)
New Competition
New Competition #
Create a new competition instance.
competition = Competition(driver_control, autonomous)How To Use #
A new competition instance can be created by passing a driver_control and autonomous callback functions.
When a driver control signal is received from a competition switch, the driver_control callback function will be executed.
Similarly, when an autonomous signal is received from a competition switch, the autonomous callback function will be executed.
# Function to run when the "driver control" signal is received
def driver_control():
    brain.screen.print("driver control signal received")

# Function to run when the "autonomous" signal is received
def autonomous():
    brain.screen.print("autonomous signal received")

# Create a new Competition instance
competition = Competition(driver_control, autonomous)
Controller Axis Changed
Controller Axis Changed #
Runs the specified function when the controller axis position changes.
controller.axis.changed(callback)How To Use #
Choose which Controller axis to monitor.
axis1axis2axis3axis4
You will need to create a function to call when the Controller Axis position is changed.
Provide the name of the function that should run when the event occurs as the callback parameter.
# Function to run when the event occurs
def run_on_axis_changed():
    brain.screen.print("Axis changed!")


# Register event with a callback function.
controller_1.axis1.changed(run_on_axis_changed)
Controller Button Pressed
Controller Button Pressed #
Runs the specified function when the controller button is pressed.
controller.button.pressed(callback)How To Use #
Choose which Controller Button to monitor.
buttonAbuttonBbuttonXbuttonYbuttonUpbuttonDownbuttonLeftbuttonRightbuttonL1buttonL2buttonR1buttonR2
You will need to create a function to call when the Controller Button is pressed.
Provide the name of the function that should run when the event occurs as the callback parameter.
# Function to run when the event occurs
def run_on_button_pressed():
    brain.screen.print("Button pressed!")

# Register event with a callback function.
controller_1.buttonA.pressed(run_on_button_pressed)
Controller Button Released
Controller Button Released #
Runs the specified function when the controller button is released.
controller.button.released(callback)How To Use #
Choose which Controller Button to monitor.
buttonAbuttonBbuttonXbuttonYbuttonUpbuttonDownbuttonLeftbuttonRightbuttonL1buttonL2buttonR1buttonR2
You will need to create a function to call when the Controller Button is released.
Provide the name of the function that should run when the event occurs as the callback parameter.
# Function to run when the event occurs
def run_on_button_released():
    brain.screen.print("Button released!")

# Register event with a callback function.
controller_1.buttonA.released(run_on_button_released)
Competition Autonomous
Competition Autonomous #
Runs the specified function when an "autonomous" mode signal is received from a competition switch.
def autonomous():
    pass
How To Use #
A new competition instance can be created by passing a driver_control and autonomous callback functions.
Create an autonomous function to pass to a competition instance.
The specified autonomous function will run when an "autonomous" mode signal is received from a competition switch.
# Function to run when the "driver control" signal is received
def driver_control():
    brain.screen.print("driver control signal received")

# Function to run when the "autonomous" signal is received
def autonomous():
    brain.screen.print("autonomous signal received")

# Create a new Competition instance
competition = Competition(driver_control, autonomous)
Competition Driver Control
Competition Driver Control #
Runs the specified function when a "driver control" mode signal is received from a competition switch.
def driver_control():
    pass
How To Use #
A new competition instance can be created by passing a driver_control and autonomous callback functions.
Create a driver_control function to pass to a competition instance.
The specified driver_control function will run when a "driver control" mode signal is received from a competition switch.
# Function to run when the "driver control" signal is received
def driver_control():
    brain.screen.print("driver control signal received")

# Function to run when the "autonomous" signal is received
def autonomous():
    brain.screen.print("autonomous signal received")

# Create a new Competition instance
competition = Competition(driver_control, autonomous)
GPS When Heading Changed
GPS When Heading Changed #
Runs the specified callback function when a GPS Sensor detects a heading change.
gps.changed(callback)How To Use #
You will need to define a function to call when the GPS Sensor detects a heading change.
Provide the name of the defined function that should run when the event occurs as the callback parameter.
# Function to run when the event occurs
def run_on_heading_change():
    brain.screen.print("GPS Heading Change Detected")

# Register event with a callback function
gps.changed(run_on_heading_change)
Limit Pressed
Limit Pressed #
Runs the specified function when the Limit Switch is pressed.
limit.pressed(callback)How To Use #
You will need to create a function to call when the Limit Switch is pressed.
Provide the name of the function that should run when the event occurs as the callback parameter.
# Function to run when the event occurs
def run_on_limit_pressed():
    brain.screen.print("Limit pressed!")

# Register event with a callback function
limit_a.pressed(run_on_limit_pressed)
Limit Released
Limit Released #
Runs the specified function when the Limit Switch is released.
limit.released(callback)How To Use #
You will need to create a function to call when the Limit Switch is released.
Provide the name of the function that should run when the event occurs as the callback parameter.
# Function to run when the event occurs
def run_on_limit_released():
    brain.screen.print("Limit released!")

# Register event with a callback function
limit_a.released(run_on_limit_released)
New Event
New Event #
Create a new event.
my_event = Event()How To Use #
Using the above syntax, a new user-defined event can be created before registering callback functions.
def run_on_broadcast1():
    brain.screen.set_cursor(1, 1)
    brain.screen.print("Broadcast1 Running")

def run_on_broadcast2():
    brain.screen.set_cursor(2, 1)
    brain.screen.print("Broadcast2 Running")

# Create new events.
my_event1 = Event()
my_event2 = Event()

# Register callback functions to the events.
# Wait to allow events to register
my_event1(run_on_broadcast1)
my_event2(run_on_broadcast2)
wait(15, MSEC)

# Broadcast the events.
my_event1.broadcast()
my_event2.broadcast()
Event Broadcast
Event Broadcast #
Broadcast event message to run listener functions.
event.broadcast()How To Use #
The code will continue to run the commands after the event.broadcast() command so that it will run at the same time as the event listener functions.
Before using this command, a user defined event must be created and register at least one callback.
def run_on_broadcast1():
    brain.screen.set_cursor(1, 1)
    brain.screen.print("Broadcast1 Running")

def run_on_broadcast2():
    brain.screen.set_cursor(2, 1)
    brain.screen.print("Broadcast2 Running")

# Create a new event.
my_event = Event()

# Register callback functions to event.
# Wait to allow events to register
my_event(run_on_broadcast1)
my_event(run_on_broadcast2)
wait(15, MSEC)

# Broadcast the event.
my_event.broadcast()
Event Broadcast and Wait
Event Broadcast and Wait #
Broadcast event message to run listener functions and wait for all listeners to finish before continuing.
event.broadcast_and_wait()How To Use #
The event.broadcast_and_wait() command will wait for all listeners to complete before returning. This will pause the code execution in the current function, until all the broadcast listeners have finished.
Before using this command, a user defined event must be created and register at least one callback.
def run_on_broadcast1():
    brain.screen.set_cursor(1, 1)
    brain.screen.print("Broadcast1 Running")

def run_on_broadcast2():
    brain.screen.set_cursor(2, 1)
    brain.screen.print("Broadcast2 Running")

# Create a new event.
my_event = Event()

# Register callback functions to event.
# Wait to allow events to register
my_event(run_on_broadcast1)
my_event(run_on_broadcast2)
wait(15, MSEC)

# Broadcast the event and wait for completion.
my_event.broadcast_and_wait()

brain.screen.set_cursor(3, 1)
brain.screen.print("Listeners finished running")
Optical Gesture Detected
Optical Gesture Detected #
Runs the callback function when gesture is detected by a V5 Optical Sensor.
optical.gesture_down(callback)How To Use #
The Optical Gesture Detected command can be used to trigger actions or behaviors when a gesture is detected by a V5 Optical Sensor.
You will need to create a function to call when a gesture is detected. Provide the name of the function that should run when the event occurs as the callback parameter.
You will also need to ensure that the Optical Sensor is set to detect gestures by calling optical.gesture_enable() before gesture commands are used.
Optical Gesture Detected can be used to detect four different gestures:
gesture_upgesture_downgesture_leftgesture_right
Example #
# Function to run when the event occurs
def run_on_gesture_detected():
    brain.screen.print("Gesture detected!")

# Set the Optical Sensor to detect gestures
optical.gesture_enable()

# Register an event with a callback function
optical.gesture_down(run_on_gesture_detected)
Optical Gesture Detected
Optical Gesture Detected #
Runs the callback function when gesture is detected by a V5 Optical Sensor.
optical.gesture_left(callback)How To Use #
The Optical Gesture Detected command can be used to trigger actions or behaviors when a gesture is detected by a V5 Optical Sensor.
You will need to create a function to call when a gesture is detected. Provide the name of the function that should run when the event occurs as the callback parameter.
You will also need to ensure that the Optical Sensor is set to detect gestures by calling optical.gesture_enable() before gesture commands are used.
Optical Gesture Detected can be used to detect four different gestures:
gesture_upgesture_downgesture_leftgesture_right
Example #
# Function to run when the event occurs
def run_on_gesture_detected():
    brain.screen.print("Gesture detected!")

# Set the Optical Sensor to detect gestures
optical.gesture_enable()

# Register an event with a callback function
optical.gesture_left(run_on_gesture_detected)
Optical Gesture Detected
Optical Gesture Detected #
Runs the callback function when gesture is detected by a V5 Optical Sensor.
optical.gesture_right(callback)How To Use #
The Optical Gesture Detected command can be used to trigger actions or behaviors when a gesture is detected by a V5 Optical Sensor.
You will need to create a function to call when a gesture is detected. Provide the name of the function that should run when the event occurs as the callback parameter.
You will also need to ensure that the Optical Sensor is set to detect gestures by calling optical.gesture_enable() before gesture commands are used.
Optical Gesture Detected can be used to detect four different gestures:
gesture_upgesture_downgesture_leftgesture_right
Example #
# Function to run when the event occurs
def run_on_gesture_detected():
    brain.screen.print("Gesture detected!")

# Set the Optical Sensor to detect gestures
optical.gesture_enable()

# Register an event with a callback function
optical.gesture_right(run_on_gesture_detected)
Optical Gesture Detected
Optical Gesture Detected #
Runs the callback function when gesture is detected by a V5 Optical Sensor.
optical.gesture_up(callback)How To Use #
The Optical Gesture Detected command can be used to trigger actions or behaviors when a gesture is detected by a V5 Optical Sensor.
You will need to create a function to call when a gesture is detected. Provide the name of the function that should run when the event occurs as the callback parameter.
You will also need to ensure that the Optical Sensor is set to detect gestures by calling optical.gesture_enable() before gesture commands are used.
Optical Gesture Detected can be used to detect four different gestures:
gesture_upgesture_downgesture_leftgesture_right
Example #
# Function to run when the event occurs
def run_on_gesture_detected():
    brain.screen.print("Gesture detected!")

# Set the Optical Sensor to detect gestures
optical.gesture_enable()

# Register an event with a callback function
optical.gesture_up(run_on_gesture_detected)
Optical Object Detected
Optical Object Detected #
Runs the callback function when an object is detected by a V5 Optical Sensor.
optical.object_detected(callback)How To Use #
The optical.object_detected command can be used to trigger actions or behaviors when an object is detected by a V5 Optical Sensor.
You will need to create a function to call when an object is detected. Provide the name of the function that should run when the event occurs as the callback parameter.
# Function to run when the event occurs
def run_on_object_detected():
    brain.screen.print("Object detected!")

# Register an event with a callback function
optical.object_detected(run_on_object_detected)
Optical Object Lost
Optical Object Lost #
Runs the callback function when an object is no longer being detected by a V5 Optical Sensor.
optical.object_lost(callback)How To Use #
The optical.object_lost command can be used to trigger actions or behaviors when an object is no longer being detected by a V5 Optical Sensor.
You will need to create a function to call when an object is no longer being detected. Provide the name of the function that should run when the event occurs as the callback parameter.
# Function to run when the event occurs
def run_on_object_lost():
    brain.screen.print("Object lost!")

# Register an event with a callback function
optical.object_lost(run_on_object_lost)
Function #
Functions
Functions #
Functions are blocks of code used to perform an action.
How To Use #
To create a function, create a meaningful function name. This means that the function name should accurately describe what it does.
Use the keyword def before your function name to define the function.
Include parentheses () enclosing optional parameters after the function name, followed by a colon:. Multiple parameters should be separated by commas (parameter1, parameter2).
The body of the function should be indented four spaces. If there isn't any code for the function to execute, a pass should be included in the function definition.
def my_function():
    pass
Example 1 #
This function has no parameters and will print "Hello" to the V5 Brain Screen.
def print_hello_world():
    brain.screen.print("Hello World")
Example 2 #
This function takes one parameter, name and will print the value of name to the V5 Brain Screen.
def print_name(name):
    brain.screen.print(name)
Looks #
Clear Row
Clear Row #
Clears a single row on the V5 Brain's screen.
brain.screen.clear_row()How To Use #
Clears the current row on the V5 Brain screen.
brain.screen.clear_row()Clears a specified row on the V5 Brain screen.
brain.screen.clear_row(ROW)How To Use #
The brain.screen.clear_row() command can accept integer values between 1 - 20, to set which row to clear. You can also call the command without any arguments to clear the current row.
Clear All Rows
Clear All Rows #
Clears the entire Print Console and resets the cursor to the first row.
brain.screen.clear_screen()How To Use #
# Print "VEXcode V5" on the first line, wait 2 seconds, then clear the Print Console
brain.screen.print("VEXcode V5")
wait(2, SECONDS)
brain.screen.clear_screen()
Draw Circle
Draw Circle #
Draws a circle on the V5 Brain's screen.
brain.screen.draw_circle(X, Y, RADIUS)How To Use #
The brain.screen.draw_circle() command requires 3 values:
- Value 1: Center Point X
- Value 2: Center Point Y
- Value 3: Radius of Circle (in pixels)
The outside line color of the circle is determined by the brain.screen.set_pen_color() command. The default line color is white.
The inside fill color of the circle is determined by the brain.screen.set_fill_color() command. The default fill color is black.
Draw Line
Draw Line #
Draws a line on the V5 Brain's screen.
brain.screen.draw_line(START_X, START_Y, END_X, END_Y)How To Use #
The brain.screen.draw_line() command requires 4 values:
- Value 1: Beginning X coordinate
- Value 2: Beginning Y coordinate
- Value 3: Ending X coordinate
- Value 4: Ending Y coordinate
The line color is determined by the brain.screen.set_pen_color() command. The default line color is white.
Draw Pixel
Draw Pixel #
Draws a pixel on the V5 Brain's screen.
brain.screen.draw_pixel(X, Y)How To Use #
The brain.screen.draw_pixel command requires 2 values:
- Value 1: X Coordinate
- Value 2: Y Coordinate
The pixel color is determined by the brain.screen.set_pen_color() command. The default pixel color is white.
Draw Rectangle
Draw Rectangle #
Draws a rectangle on the V5 Brain's screen.
brain.screen.draw_rectangle(X, Y, WIDTH, HEIGHT)How To Use #
The brain.screen.draw_rectangle() command requires 4 values:
- Value 1: Top Left Corner X coordinate
- Value 2: Top Left Corner Y coordinate
- Value 3: Width of the rectangle
- Value 4: Height of the rectangle
The border line color of the rectangle is determined by the brain.screen.set_pen_color() command. The default line color is white.
The inside fill color of the rectangle is determine by the brain.screen.set_fill_color() command. The default fill color is black.
Next Row
Next Row #
Sets the print output cursor of the Print Console to the next line.
brain.screen.next_row()How To Use #
By default, all projects begin with the print cursor at row 1. The brain.screen.next_row() command will move the cursor down by a single line on the Print Console.
# Print "VEXcode" on the first line, then "V5" on the next line
brain.screen.print("VEXcode")
brain.screen.next_row()
brain.screen.print("V5")
Print #
Prints values or text to the Print Console.
brain.screen.print("VEXcode")How To Use #
The brain.screen.print() command will print data to the Print Console.
Print words and numbers:
brain.screen.print("Number:", 10)Print numbers with decimal points:
brain.screen.print("Timer Value:", brain.timer.time(SECONDS), precision=2)Print the reported value from a variable:
brain.screen.print(my_variable)Print the reported value from a sensor or device:
brain.screen.print(drivetrain.is_done())
Set Cursor
Set Cursor #
Sets the cursor location on the V5 Brain's screen.
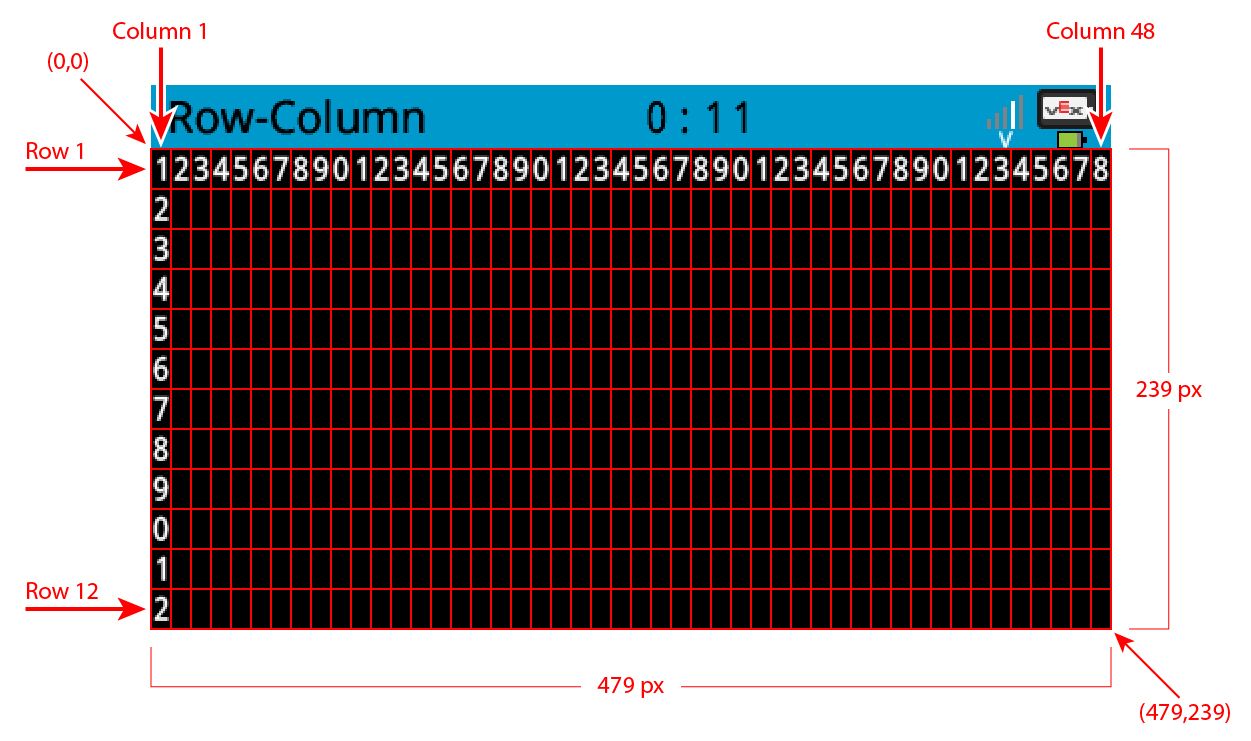
brain.screen.set_cursor(ROW, COLUMN)How To Use #
The brain.screen.set_cursor() command requires 2 values:
- Value 1: Screen row position
- Value 2: Screen column position
Set the cursor's row and column position to have a brain.screen.print() command display at a specific location on the screen.
Accepts a range for row of 1 to 20.
Accepts a range for column of 1 to 80.
The V5 Brain allows you to change the size of the font printed on the screen. Changing the font will affect the number of rows and columns available on the V5 Brain's screen.
V5 Brain Font Size - Number of Rows:
FontType.MONO12- 20 RowsFontType.MONO15- 16 RowsFontType.MONO20/FontType.PROP20- 12 Rows (Default)FontType.MONO30/FontType.PROP30- 8 RowsFontType.MONO40/FontType.PROP40- 6 RowsFontType.MONO60/FontType.PROP60- 4 Rows
V5 Brain Font Size - Number of Columns:
FontType.MONO12- 80 ColumnsFontType.MONO15- 68 ColumnsFontType.MONO20/FontType.PROP20- 48 Columns (Default)FontType.MONO30/FontType.PROP30- 32 ColumnsFontType.MONO40/FontType.PROP40- 24 ColumnsFontType.MONO60/FontType.MONO60- 16 Columns
Set Fill Color
Set Fill Color #
Sets the color that fills in shapes drawn on the V5 Brain's screen.
brain.screen.set_fill_color(COLOR)How To Use #
The brain.screen.set_fill_color() command is used to set the color of the inside of circles and rectangles drawn on the V5 Brain's screen.
Replace the COLOR parameter with one of the following actions:
Color.BLACKColor.WHITEColor.REDColor.GREENColor.BLUEColor.YELLOWColor.ORANGEColor.PURPLEColor.CYANColor.TRANSPARENT
The fill color will be used for any subsequent objects drawn on the V5 Brain's screen until it is changed again.
Set Font
Set Font #
Sets the style and size of font used on the V5 Brain's screen when printing values.
brain.screen.set_font(FONT_TYPE)How To Use #
There are two different types of fonts available on the V5 Brain's screen:
- Monospaced (MONO) - each character takes up the same width.
- Proportional (PROP) - each character takes up different size widths based on the character.
Choose which font type and size to use by replacing the FONT_TYPE parameter. You can select from the following font options.
FontType.MONO12FontType.MONO15FontType.MONO20FontType.MONO30FontType.MONO40FontType.MONO60FontType.PROP20FontType.PROP30FontType.PROP40FontType.PROP60
The new font size will be used for any future text written to the V5 Brain's screen until it is changed again.
Set Pen Color
Set Pen Color #
Sets the color of lines drawn on the V5 Brain's screen.
brain.screen.set_pen_color(COLOR)How To Use #
The brain.screen.set_pen_color() command is used to set the color of lines, pixels, and text drawn on the V5 Brain's screen.
brain.screen.set_pen_color() can also be used to set the outline color of circles and rectangles drawn on the V5 Brain's screen.
Replace the COLOR parameter with one of the following options:
Color.BLACKColor.WHITEColor.REDColor.GREENColor.BLUEColor.YELLOWColor.ORANGEColor.PURPLEColor.CYANColor.TRANSPARENT
The pen color will be used for any subsequent objects drawn on the V5 Brain's screen until it is changed again.
Set Pen Width
Set Pen Width #
Sets the width of the outline for shapes drawn on the V5 Brain's screen.
brain.screen.set_pen_width(PEN_WIDTH)How To Use #
The brain.screen.set_pen_width() command is used to set the width of the line on the outside of circles and rectangles drawn on the V5 Brain's screen.
The brain.screen.set_pen_width() command can accept integer values, with a larger value equating to a larger width. Replace the PEN_WIDTH parameter with an integer value.
Rumble Controller
Rumble Controller #
Triggers a vibrating effect on your V5 Controller.
controller.rumble(".-.-")How To Use #
The controller.rumble(".-.-") command uses the rumble motor in your V5 controller to provide feedback.
You can create any pattern you want using a combination of "." and "-" characters in the string. The "." character will create a short rumble. The "-" character will create a long rumble.
Clear Row
Clear Row #
Clears the current row on the V5 Controller's screen.
controller.screen.clear_row()Clears a specified row on the V5 Controller's screen.
controller.screen.clear_row(ROW)How To Use #
The controller.screen.clear_row() command can accept integer values between 1 - 3, to set which row to clear. You can also call the command without any arguments to clear the current row.
The V5 Controller does not allow you to change the size of the font printed on the screen.
V5 Controller Font Size - Number of Rows:
- Standard Font - 3 Rows (Default)

Clear All Rows
Clear All Rows #
Clears the entire V5 Controller's screen.
controller.screen.clear_screen()How To Use #
controller.screen.clear_screen() will not change the screen's cursor.
Use the controller.screen.set_cursor() command to set the screen's cursor to a specific position.
Next Row
Next Row #
Sets the print output cursor on the V5 Controller's screen to the next available row.
controller.screen.next_row()How To Use #
By default, all projects begin with the screen cursor at row 1 column 1. The controller.screen.next_row() command will move the cursor down by a single row on the screen. controller.screen.next_row() will also set the cursor's column to position 1.
The V5 Controller does not allow you to change the size of the font printed on the screen.
V5 Controller Font Size - Number of Rows:
- Standard Font - 3 Rows (Default)
V5 Controller Font Size - Number of Columns:
- Standard Font - 20 Columns (Default)
Print #
Prints values on the V5 Controller's screen.
controller.screen.print("VEXcode") How To Use #
The controller.screen.print() command will print data at a cursor location on the screen.
All new projects begin with the screen cursor at row 1 column 1.
Print words and numbers:
controller.screen.print("Number:", 10)Print the reported value from a variable:
controller.screen.print(my_variable)Print the reported value from a sensor or device:
controller.screen.print(drivetrain.is_done())
Set Cursor
Set Cursor #
Sets the cursor location for controller.screen.print() command on the V5 Controller's screen.
controller.screen.set_cursor(ROW, COLUMN)How To Use #
The controller.screen.set_cursor() command requires 2 values:
- Value 1: Screen row position
- Value 2: Screen column position
Set the cursor's row and column position to have a controller.screen.print() command display at a specific location on the screen.
controller.screen.set_cursor() accepts a range for row of 1 to 3.
controller.screen.set_cursor() accepts a range for column of 1 to 20.
The V5 Controller does not allow you to change the size of the font printed on the screen.
V5 Controller Font Size - Number of Rows:
- Standard Font - 3 Rows (Default)
V5 Controller Font Size - Number of Columns:
- Standard Font - 20 Columns (Default)
LED Off
LED Off #
Turns a 3-Wire LED off.
led.off()LED On
LED On #
Turns a 3-wire LED on.
led.on()LED On/Off
LED On/Off #
Turns a LED on or off.
led.on()led.off()How To Use #
led.on() turns on the LED device.
led.off() turns off the LED device.
Monitor Sensor
Monitor Sensor #
The monitor_sensor() command is used to add sensors to the monitor console so that the sensor values can monitored.
monitor_sensor("sensor_name", "another_sensor_name", ...)How To Use #
To monitor sensor values in the monitor console, use the monitor_sensor() function by adding the identifiers of the sensors as string parameters. This function should be called at the start of the program.
Below is the list of supported sensor identifiers:
brain.timer.timedrivetrain.is_donedrivetrain.is_movingdrivetrain.headingdrivetrain.rotationdrivetrain.velocity_rpmdrivetrain.velocity_percentintake_motor_group.is_doneintake_motor_group.is_spinningintake_motor_group.position_degreesintake_motor_group.position_turnsintake_motor_group.velocity_rpmintake_motor_group.velocity_percentbottom_distance.is_object_detectedbottom_distance.object_distance_mmbottom_distance.object_distance_inchesbottom_line_tracker.reflectivitymiddle_line_tracker.reflectivitytop_line_tracker.reflectivityroller_optical.is_near_objectroller_optical.colorroller_optical.brightnessroller_optical.huegps.position_mmgps.position_inchesgps.heading
When adding sensor identifiers to the monitor_sensor() command, they have to be added as strings - therefore enclosed with quotation marks:
monitor_sensor("bottom_line_tracker.reflectivity")Multiple sensor identifiers, separated by commas, can be added to the monitor_sensor() command:
monitor_sensor(“distance.object_distance_mm”, “drivetrain.rotation”, “brain.timer.time”)Example #
This project uses the gps position sensor identifier to show both the X and the Y position (in mm and inches) of the robot as it drives toward the vertical center of the field. It also uses the timer sensor identifier to show the time in seconds. These sensor identifiers are passed into the motor_sensor() command.
- Starting Position: A
- Orientation: Facing Red Alliance Mobile Goal
- Preload: Zero Rings
def main():
    monitor_sensor("brain.timer.time", "gps.position_mm", "gps.position_inches")
    drivetrain.drive(FORWARD)
    while gps.x_position(MM) < 0:
        wait(5, MSEC)
    drivetrain.stop()
    drivetrain.turn_for(RIGHT, 90, DEGREES)

main()
Monitor Variable
Monitor Variable #
The monitor_variable() command is used to add variables to the monitor console so that the value of the variables can be monitored.
monitor_variable("my_variable", "my_boolean", ...)How To Use #
To add variables to the monitor console, use the monitor_variable() command. Add the name of the variable(s) as strings in the command. Only global variables can be monitored with the monitor_variable() command.
Examples #
In this project, the robot will score 20 points by picking up the Yellow Mobile Goal and dropping it off in the Alliance Home Zone.
- Starting Position: A
- Orientation: Facing Yellow Mobile Goal
- Preload: Zero Rings
spin_amount = 0

def main():
    global spin_amount
    monitor_variable("spin_amount")

    # Set the spin_amount variable to 1000
    spin_amount = 1000

    # Spin the Fork Motor Group down for 1700 degrees
    fork_motor_group.spin_for(FORWARD, 1700, DEGREES)
    drivetrain.drive_for(FORWARD, 1300, MM)

    # Pick up the Mobile Goal by spinning
    # the Fork Motor Group up for spin_amount (1000)
    fork_motor_group.spin_for(REVERSE, spin_amount, DEGREES)
    drivetrain.drive_for(REVERSE, 900, MM)

    # Drop off the Mobile Goal by spinning
    # the Fork Motor Group up for spin_amount (1000)
    fork_motor_group.spin_for(FORWARD, spin_amount, DEGREES)
    drivetrain.drive_for(REVERSE, 300, MM)

    # Update the spin_amount by 700 (1000 + 700 = 1700)
    spin_amount = spin_amount + 700

    # Spin the Fork Motor Group up for spin_amount (1700)
    fork_motor_group.spin_for(REVERSE, spin_amount, DEGREES)


main()
Console Print
Console Print #
Prints values or text to the Print Console.
print("VEXcode")How To Use #
The print command will print data at the cursor location on the Print Console.
All new projects begin with the cursor at row 1.
Printing Lines #
By default, Python will always add a new line after each print command.
To print multiple values to a single line, you can utilize the end parameter.
print("This text will be ", end="")
print("printed on the same line")
Printing Values #
You can use the Python format method to format the values being printed in the print statements.
To use the format method, you must first provide a template string with replacement fields enclosed by a set of curly braces - {}.
Then, call the format method on the template string. Any parameter(s) passed into the format method will be inserted into the replacement fields in sequence (if there are multiple replacement fields).
You can also provide formatting options into the template string to set the number of decimal places to be printed. Any formatting options must begin with a semicolon - :.
In the example below, the value of the Brain Timer will be inserted into the single replacement field in the template string and printed to two decimal places.
print("{:.2f}".format(brain.timer.time(SECONDS)))Similarly, the example below will print the row/column position of the Brain Cursor. The number of replacement fields (enclosed by {}) must match the number of parameters passed into the format method.
# The value of brain.screen.row() will be passed into the first replacement field
# The value of brain.screen.column() will be passed into the second replacement field
print("Row: {:d}, Column: {:d}".format(brain.screen.row(), brain.screen.column()))
Here is a list of commonly-used format specifiers. Remember that to use a format specifier inside a replacement field (enclosed by {}), it must follow a semicolon - :.
d- Decimal Integerf- Floating Point Numbero- Octal Integers- String
Using the Floating Point Number format specifier, f, you can also specify how many decimal places to format a number.
.2f- Formats a floating point number with 2 decimal places.4f- Formats a floating point number with 4 decimal places
Printing Colors #
You can use any of the color codes below with a print command to set the color of the text being printed.
The example below will show two ways in which a color sequence command can be used when printing. All color codes will need to be attached to an escape sequence - \033.
[31m- Red[32m- Green[34m- Blue[30m- Black[37m- White[33m- Yellow[91m- Orange[35m- Purple[36m- Cyan[97m- Transparent
# Using color codes in-line
# This will print "VEXcode" in Red to the Print Console
print("\033[31mVEXcode")

# Using color codes in separate commands
# Sets the print color for any subsequent prints
print("\033[31m")
print("VEXcode")
Console Clear
Console Clear #
Clears the Print Console.
print("\033[2J")How To Use #
The print command used with the \033[2J command sequence will clear the Print Console.
Example #
The example below will print "VEXcode" and then clear the Print Console after 3 seconds.
print("\033[31mVEXcode")
wait(3, SECONDS)
print("\033[2J")
Magnet #
Electromagnet drop
Electromagnet drop #
Allows the V5 Electromagnet to drop the object it is currently holding.
magnet.drop()After using the magnet.drop() command, the magnet will need to cool down before it can be used again.
Example #
This example will pickup an object, drive forward, then use magnet.drop() to drop the object.
magnet.pickup()
drivetrain.drive_for(FORWARD, 200, MM)
magnet.drop()
Electromagnet pickup
Electromagnet pickup #
Allows the V5 Electromagnet to pick up an object.
magnet.pickup()After using the magnet.pickup() command, the magnet will need to cool down before it can be used again.
Example #
This example will use magnet.pickup() to pick up an object, drive forward, and then drop the object.
magnet.pickup()
drivetrain.drive_for(FORWARD, 200, MM)
magnet.drop()
Electromagnet set power
Electromagnet set power #
Changes the power used by the V5 Electromagnet when picking up an object.
magnet.set_power(50)The power can be set from 0% to 100%.
Example #
This example will use magnet.set_power() to set the electromagnet to full power, pick up an object, drive forward, and then drop the object.
magnet.set_power(100)
magnet.pickup()
drivetrain.drive_for(FORWARD, 200, MM)
magnet.drop()
Motion #
Set Motor Torque
Set Motor Torque #
Sets the torque of the V5 Smart Motor or Motor Group.
motor.set_max_torque(AMOUNT, PERCENT)How To Use #
This command accepts a range of 0% to 100%.
The set_max_torque command can accept decimals, integers, or numeric values.
Example #
This example will spin the Claw Motor to the 40 degree position with only 20% maximum torque. This allows the claw to grab an object without damaging it with too much force.
claw_motor.set_max_torque(20, PERCENT)
claw_motor.set_position(40, DEGREES)
Set Motor Position
Set Motor Position #
Sets a V5 Smart Motor's or Motor Group's encoder position(s) to the given value.
motor.set_position(VALUE, UNITS)How To Use #
This command can be used to set a Motor or Motor Group's position to a given positional value.
Usually, the motor.set_position command is used to set the position to 0 to reset a Motor or Motor Group's encoder position(s).
The motor.set_position command accepts DEGREES or TURNS as valid UNITS.
Set Motor Stopping
Set Motor Stopping #
Sets the stopping behavior of a V5 Smart Motor or Motor Group.
motor.set_stopping(MODE)How To Use #
The MODE parameter can be replaced with any of the following options:
- BRAKE: will cause the Motor/Motor Group to come to an immediate stop.
- COAST: lets the Motor/Motor Group spin gradually to a stop.
- HOLD: will cause the Motor/Motor Group to come to an immediate stop, and returns it to its stopped position if moved.
The stopping behavior set by this command will apply to subsequent motion commands for the entirety of the project, unless otherwise changed.
Example #
This example will make the Arm Motor spin forward for 90 degrees (to raise the arm) and then will hold its position.
arm_motor.set_stopping(HOLD)
arm_motor.spin_for(FORWARD, 90, DEGREES)
Set Motor Timeout
Set Motor Timeout #
Sets a time limit for the V5 Smart Motor or Motor Group movement commands.
motor.set_timeout(TIME, SECONDS)How To Use #
A Motor or Motor Group's is used to prevent motion commands that do not reach their position from preventing subsequent commands from running.
An example of a Motor not reaching its position is an Arm or Claw that reaches its mechanical limit and cannot complete its movement.
Example #
This example will set the timeout of the spin_to_position commands to 2 seconds.
If the Claw Motor has not reached the position of 270 degrees after 2 seconds, the Claw Motor will stop spinning.
claw_motor.set_timeout(2, SECONDS)
claw_motor.spin_to_position(270, DEGREES)
Set Motor Velocity
Set Motor Velocity #
Sets the speed of a V5 Smart Motor or Motor Group.
motor.set_velocity(VELOCITY, UNITS)How To Use #
This command accepts a range from -100% to 100% or -200rpm to 200rpm.
Acceptable UNITS parameter is either PERCENT or RPM.
Set motor velocity will accept a "rotations per minute" (RPM) value between -200 and 200.
Setting a V5 Smart Motor's velocity to a negative value will cause the Motor/Motor Group to spin in reverse.
Setting a V5 Smart Motor's velocity to 0 will prevent the Motor/Motor Group from spinning.
Example #
This example will set the Intake Motor Group to spin at 25% speed to the 90 degree position.
intake_motor_group.set_velocity(25, PERCENT)
intake_motor_group.spin_to_position(90, DEGREES)
Spin
Spin #
This command spins a V5 Smart Motor or Motor Group forever, until a new motion command is used or the program is stopped.
motor.spin(FORWARD)How To Use #
Choose which direction the Motor or Motor Group will spin to either FORWARD or REVERSE.
motor.spin(REVERSE)Motor Spin At Voltage
Motor Spin At Voltage #
Spins a V5 Smart Motor or Motor Group at a specified voltage.
motor.spin(FORWARD, 10.0, VOLT)How To Use #
Spin at voltage accepts a range from -12V to 12V.
Use the FORWARD parameter to drive the V5 Smart Motor or Motor Group in the forward direction.
motor.spin(FORWARD, 10.0, VOLT)Use the REVERSE parameter to drive the V5 Smart Motor or Motor Group in the reverse direction.
motor.spin(REVERSE, 10.0, VOLT)Spinning a Motor or Motor Group at a negative voltage will cause the Motor/Motor Group to spin in the opposite direction than the one specified.
Spin For
Spin For #
This command spins a V5 Smart Motor or Motor Group for a given amount of degrees or turns.
motor.spin_for(DIRECTION, AMOUNT, UNIT)How To Use #
Choose which DIRECTION the Motor or Motor Group will spin to: FORWARD or REVERSE.
Choose the UNIT of measurement to be either DEGREES or TURNS.
Choose whether or not this command should be waited on by proceeding commands by setting an optional fourth parameter to either wait=True or wait=False.
motor.spin_for(FORWARD, 90, DEGREES, wait=False)By default, this command is a blocking command unless wait=False is passed as the fourth parameter.
Spin To Position
Spin To Position #
Spins a V5 Smart Motor's or Motor Group's encoder(s) to the given position.
motor.spin_to_position(POSITION, UNITS)How To Use #
This command will tell a Motor or Motor Group to travel to a specific position. Based on the current position of the Motor or Motor Group, spin_to_position will determine the direction to rotate.
Choose the unit of measurement to be either DEGREES or TURNS.
Choose whether or not this command should be waited by other commands by changing the optional third parameter to either wait=True or wait=False.
motor.spin_to_position(90, DEGREES, wait=False)Setting wait=True means that proceeding commands will not execute until the motor spin is completed. Conversely, wait=False will not wait for it to be completed.
By default, this command will have the wait to be set to True.
Stop Motor
Stop Motor #
Stops a V5 Smart Motor or Motor Group.
motor.stop()Example #
This example shows a motor spinning for 3 seconds before stopping.
motor.spin(FORWARD)
wait(3, SECONDS)
motor.stop()
Set Motor Controller Velocity
Set Motor Controller Velocity #
Sets the speed of a Motor393 connected to a Motor Controller 29.
motor393.set_velocity(VELOCITY, PERCENT)How To Use #
The VELOCITY parameter accepts a range of -100% to 100%.
Setting a Motor393's velocity to a negative value will cause the Motor393 to spin in reverse.
The sequence below will cause the Motor393 to spin in reverse, even though the FORWARD parameter is passed.
motor393.set_velocity(-100, PERCENT)
motor393.spin(FORWARD)
Setting a Motor393's velocity to 0 will prevent the Motor from spinning.
Spin Motor Controller
Spin Motor Controller #
Spins a Motor393 connected to a Motor Controller 29.
motor393.spin(DIRECTION)How To Use #
This command spins a Motor393 forever, until a new motor command is used or the program is stopped.
Choose which direction the motor will spin to by setting the DIRECTION parameter to either FORWARD or REVERSE.
Stop Motor Controller
Stop Motor Controller #
Stops a Motor393 connected to a Motor Controller 29.
motor393.stop()How To Use #
The example below will stop a Motor393 device after spinning for 3 seconds.
motor393.spin(FORWARD)
wait(3, SECONDS)
motor393.stop()
Spin Servo
Spin Servo #
Spins a Servo Motor to a set position.
servo.set_position(POSITION, DEGREES)How To Use #
The servo.set_position() command accepts a range of values from -50 to 50 for the POSITION parameter.
Example #
The below example spins the servo motor to 25 degrees, waits 2 seconds, then spins the motor to -25 degrees.
servo.set_position(25, DEGREES)
wait(2, SECONDS)
servo.set_position(-25, DEGREES)
Sensing #
Acceleration Of Analog Accelerometer
Acceleration Of Analog Accelerometer #
Reports the acceleration value from one axis on the Analog Accelerometer.
accel_2g.acceleration()How to Use #
This command reports a range from -2.0 G to 2.0 G or -6.0 G to 6.0 G depending on the jumper setting on the Analog Accelerometer.
Battery Capacity
Battery Capacity #
Reports the charge level of the V5 Brain's battery.
brain.battery.capacity()How To Use #
Battery capacity reports a range from 0% to 100%.
Battery Current
Battery Current #
Reports the current of the V5 Brain's battery.
brain.battery.current(CurrentUnits.AMP)How To Use #
Battery current reports a range from 0.0 amps to 20.0 amps.
Battery Voltage
Battery Voltage #
Reports the voltage of the V5 Brain's battery.
brain.battery.voltage(VOLT)How To Use #
Battery voltage reports a range from 10.0 volts to 14.4 volts.
Cursor Column
Cursor Column #
Reports the column value of the V5 Brain's screen cursor location.
brain.screen.column()How To Use #
Screen column reports a range from 1 to 80.
The V5 Brain allows you to change the size of the font printed on the screen. Changing the font will affect the number of columns available on the V5 Brain's screen.
V5 Brain Font Size - Number of Columns:
FontType.MONO12- 80 ColumnsFontType.MONO15- 68 ColumnsFontType.MONO20/FontType.PROP20- 48 Columns (Default)FontType.MONO30/FontType.PROP30- 32 ColumnsFontType.MONO40/FontType.PROP40- 24 ColumnsFontType.MONO60/FontType.MONO60- 16 Columns
Screen Pressed
Screen Pressed #
Reports if the V5 Brain's touchscreen is currently being pressed.
brain.screen.pressing()How To Use #
brain.screen.pressing reports True if the V5 Brain's touchscreen is being pressed.
brain.screen.pressing reports False if the V5 Brain's touchscreen is not being pressed.
Cursor Row
Cursor Row #
Reports the row value of the V5 Brain's screen cursor location.
brain.screen.row()How To Use #
Screen row reports a range from 1 to 20.
The V5 Brain allows you to change the size of the font printed on the screen. Changing the font will affect the number of rows available on the V5 Brain's screen.
V5 Brain Font Size - Number of Rows:
FontType.MONO12- 20 RowsFontType.MONO15- 16 RowsFontType.MONO20/FontType.PROP20- 12 Rows (Default)FontType.MONO30/FontType.PROP30- 8 RowsFontType.MONO40/FontType.PROP40- 6 RowsFontType.MONO60/FontType.PROP60- 4 Rows
Brain Screen xPosition
Brain Screen xPosition #
Reports the X coordinate of the location of the last detected touch on the V5 Brain's touchscreen.
brain.screen.x_position()How To Use #
brain.screen.x_position() is used to capture the X coordinate of the last press on the V5 Brain's touchscreen.
It can be used with brain.screen.y_position() to get the (x,y) coordinate, and create interactivity between the V5 and the end user.
brain.screen.x_position() return an integer in a range of 0 to 480 pixels.
my_x_coordinate = brain.screen.x_position()Brain Screen yPosition
Brain Screen yPosition #
Reports the Y coordinate of the location of the last detected touch on the V5 Brain's touchscreen.
brain.screen.y_position()How To Use #
brain.screen.y_position() is used to capture the Y coordinate of the last press on the V5 Brain's touchscreen.
It can be used with brain.screen.x_position() to get the (x,y) coordinate, and create interactivity between the V5 and the end user.
brain.screen.y_position() return an integer in a range of 0 to 240 pixels.
my_y_coordinate = brain.screen.y_position()Reset Timer
Reset Timer #
Resets the V5 Brain's timer.
brain.timer.clear()How To Use #
The Brain's timer begins at the beginning of each project. The clear timer command is reset the timer value back to 0 seconds.
Example #
In this example, the timer will be reset before moving the Drivetrain forward for 3 seconds. After 3 seconds has elapsed, the Drivetrain will stop.
brain.timer.clear()
while not brain.timer.time(SECONDS) > 3:
    drivetrain.drive(FORWARD)
drivetrain.stop()
Timer Value
Timer Value #
Reports the value of the V5 Brain's timer in the provided UNITS.
brain.timer.time(UNITS)How To Use #
The timer starts at 0 seconds when the program starts, and reports the timer's value as a decimal value.
The UNITS parameter accepts either SECONDS or MSEC (milliseconds) as a valid argument.
while True:
    brain.screen.clear_screen()
    brain.screen.set_cursor(1, 1)
    brain.screen.print("Timer in Seconds: ", brain.timer.time(SECONDS))

    # A brief wait to print values without distortion or tearing
    wait(20, MSEC)
Pressing Bumper
Pressing Bumper #
Reports if the Bumper Switch is currently being pressed.
bumper.pressing()How To Use #
Pressing bumper reports True if the Bumper Switch is being pressed.
Pressing bumper reports False if the Bumper Switch is not being pressed.
Position Of Controller
Position Of Controller #
Reports the position of a joystick on the V5 Controller along an axis.
controller.axis1.position()How To Use #
controller.axis1.position reports a range between -100 to 100.
controller.axis1.position will report zero (0) when a joystick axis is centered.
Choose which Controller axis to report.
- axis1 - right Joystick (left and right)
- axis2 - right Joystick (up and down)
- axis3 - left Joystick (up and down)
- axis4 - left Joystick (left and right)
Pressing Controller
Pressing Controller #
Reports if a button on the V5 Controller is pressed.
controller.buttonUp.pressing()How To Use #
Pressing controller reports True if the selected Controller button is being pressed.
Pressing controller reports False if the selected Controller button is not pressed.
Choose which Controller button to detect for a press:
buttonUpbuttonDownbuttonLeftbuttonRightbuttonXbuttonYbuttonAbuttonBbuttonL1buttonL2buttonR1buttonR2
Cursor Column
Cursor Column #
Reports the column number of the Controller's screen cursor location.
controller.screen.column()How To Use #
Cursor row reports a range from 1 to 80.
The V5 Controller does not allow you to change the size of the font printed on the screen.
V5 Controller Font Size - Number of Columns:
- Standard Font - 20 Columns (Default)
Cursor Row
Cursor Row #
Reports the row number of the Controller's screen cursor location.
controller.screen.row()How To Use #
Cursor row reports a range from 1 to 20.
The V5 Controller does not allow you to change the size of the font printed on the screen.
V5 Controller Font Size - Number of Rows:
- Standard Font - 3 Rows (Default)
Digital In
Digital In #
Reports value of the digital in signal.
digital_in.value()How To Use #
The V5 3-Wire ports function at a 5V logic signal voltage level.
The digital_in.value() command reports 1 when the digital input signal is high.
The digital_in.value() command reports 0 when the digital input signal is low.
Digital out
Digital out #
Sets the logic level of a digital out 3-Wire port.
digital_out.set(True)How To Use #
The V5 3-Wire ports function at a 5V logic signal voltage level.
The digital_out.set(True) command sets the digital signal to output a high or low logic signal.
Choose to output a high or low digital logic signal.
- Set the output to high:
digital_out.set(True) - Set the output to low:
digital_out.set(False)
Distance Object Found
Distance Object Found #
Reports if the Distance sensor sees an object within its field of view.
distance.is_object_detected()How To Use #
Distance object found reports True when the Distance sensor sees an object or surface within its field of view.
Distance object found reports False when the Distance sensor does not detect an object or surface.
Object Distance
Object Distance #
Reports the distance of the nearest object from the Distance sensor.
distance.object_distance(MM)How To Use #
Object distance reports a range from 20mm to 2000mm.
Acceptable values for UNIT are: MM or INCHES.
Object Size
Object Size #
Reports the size of an object the Distance Sensor detects.
distance.object_size()
How To Use #
Determines the size of the object detected (none, small, medium, large) based on the amount of light reflected and returned to the sensor.
If an object is found, the function will return ObjectSizeType.SMALL, ObjectSizeType.MEDIUM, or ObjectSizeType.LARGE.
If there is no object found, the function will return ObjectSizeType.NONE.
Object velocity
Object velocity #
Reports the current velocity of an object in m/s.
distance.object_velocity()
How To Use #
Object velocity reports the current velocity of an object in m/s (meters per second).
Drive Current
Drive Current #
Reports the amount of current that the Drivetrain is currently using.
drivetrain.current(CurrentUnits.AMP)How To Use #
drivetrain.current reports a range from 0.0 to 2.5 amps.
Drive Efficiency
Drive Efficiency #
Reports the efficiency of the Drivetrain.
drivetrain.efficiency(PERCENT)How To Use #
Drive efficiency reports the value of the power (in watts) the motor is using (input), versus the amount of power (in watts) the motor is providing (output).
A V5 Drivetrain typically reaches a maximum efficiency of 65% under normal use cases.
Drive efficiency reports a range from 0% to 100%.
Drive Heading
Drive Heading #
Reports the direction that the Drivetrain is facing by using the Gyroscopic (Gyro) sensor's current angular position.
drivetrain.heading(DEGREES)How To Use #
The drive heading command reports an increase in heading when rotating clockwise.
Drive heading reports a range from 0.00 to 359.99 degrees.
Drive Is Done
Drive Is Done #
Reports if the Drivetrain has completed its movement.
drivetrain.is_done()How To Use #
Drive is done reports True when the robot's Drivetrain has completed its movement.
Drive is done reports False when the robot's Drivetrain is still moving.
Drive Is Moving
Drive Is Moving #
Reports if the Drivetrain is currently moving.
drivetrain.is_moving()How To Use #
Drive is moving reports True when the Drivetrain's motors are moving.
Drive is moving reports False when the Drivetrain's motors are stopped.
Drive Power
Drive Power #
Reports the amount of power output the Drivetrain is currently generating.
drivetrain.power(PowerUnits.WATT)How To Use #
Drive power reports a range from 0.0 to 22.0 watts.
Drive Rotation
Drive Rotation #
Reports the Drivetrain's angle of rotation when configured with a 3-Wire Gyro Sensor or V5 Inertial Sensor.
drivetrain.rotation(DEGREES)How To Use #
Drive rotation reports a positive value when the Drivetrain turns in a clockwise direction.
Drive rotation reports a negative value when the Drivetrain turns in a counter-clockwise direction.
Drive Temperature
Drive Temperature #
Reports the temperature of the V5 Smart Motors powering the Drivetrain.
drivetrain.temperature(PERCENT)How To Use #
Drive temperature reports a range from 0% to 100%.
Drive Torque
Drive Torque #
Reports the amount of torque (rotational force) the Drivetrain is currently using.
drivetrain.torque(units)How To Use #
drivetrain.torque reports a range from 0.0 to 18.6 inch-pounds (InLB) if the provided UNITS parameter is TorqueUnits.INLB.
Alternatively, a range from 0.0 to 2.1 Newton-meters (Nm) is reported if the provided UNITS parameter is TorqueUnits.NM.
Drive Velocity
Drive Velocity #
Reports the current velocity of the Drivetrain.
drivetrain.velocity(UNITS)How To Use #
drivetrain.velocity returns a decimal value representing the current velocity of the Drivetrain.
Acceptable UNITS are PERCENT and RPM.
If the provided UNITS parameter is PERCENT, the reported values ranges between -100% to 100%.
Alternatively, if the provided UNITS is RPM, the range of reported values vary based on the Gear Cartridge installed in the V5 Smart Motors used in the Drivetrain.
- Red Cartridge: -100rpm to 100rpm
- Green Cartridge: -200rpm to 200rpm
- Blue Cartridge: -600rpm to 600rpm
Shaft Encoder Position
Shaft Encoder Position #
Reports the rotational position of the Shaft Encoder.
encoder.position(UNITS)How To Use #
The UNITS parameter accepts either DEGREES or TURNS as a value.
Position of shaft encoder reports the distance the Shaft Encoder has rotated in integer numbers for degrees, and decimal numbers for turns.
Set Shaft Encoder Position
Set Shaft Encoder Position #
Sets the Shaft Encoder's position to the given positional value.
encoder.set_position(POSITION, UNITS)How To Use #
The set shaft encoder position command can be used to set the Shaft Encoder's position to any given positional value.
The UNITS parameter accepts either DEGREES or TURNS as a valid argument.
Usually, the set shaft encoder position command is used to set the position to 0, to reset the Shaft Encoder's position.
Shaft Encoder Velocity
Shaft Encoder Velocity #
Reports the current velocity of a Shaft Encoder.
encoder.velocity(UNITS)How To Use #
Velocity of shaft encoder reports a decimal value in either degrees per second (dps) or rotations per minute (rpm).
The UNITS parameter accepts either VelocityUnits.DPS or RPM as a value.
GPS Acceleration
GPS Acceleration #
Reports the acceleration value of the specified axis on a GPS Sensor.
gps.acceleration(AXIS)How To Use #
The gps.acceleration() command reports a numerical value in the range of -4.0 to 4.0 Gs.
It can report acceleration values from three different axes based on the value passed as the AXIS parameter.
Used with the AxisType.XAXIS parameter, the value reported will be the acceleration value of a GPS Sensor's forward and backward rotations
Used with the AxisType.YAXIS parameter, the value reported will be the acceleration value of a GPS Sensor's left and right rotations
Used with the AxisType.ZAXIS parameter, the value reported will be the acceleration value of a GPS Sensor's up and down movements
Example #
# Print the current acceleration on the GPS Sensor's X axis
brain.screen.print("Acceleration on X: ", gps.acceleration(AxisType.XAXIS))
GPS Calibrate
GPS Calibrate #
Starts the calibration process for a GPS Sensor.
gps.calibrate()How To Use #
A GPS Sensor must remain still during the calibration process.
# Calibrate the GPS Sensor before starting any program code
gps.calibrate()
GPS Gyro Rate
GPS Gyro Rate #
Reports the rate of rotation from the specified axis on a GPS Sensor.
gps.gyro_rate(AXIS, UNITS)How To Use #
The gps.gyro_rate() command reports the rate of rotation on an axis with the range of values reported between -1000 to 1000 if VelocityUnits.DPS is used as the UNITS parameter, or between -167 to 167 if VelocityUnits.RPM is used.
The AXIS parameter accepts the following values for specifying which axis to get rate of rotation from:
AxisType.XAXIS: reports the rate of rotation when a GPS Sensor rotates in the X-Axis (based on the orientation of the sensor)
AxisType.YAXIS: reports the rate of rotation when a GPS Sensor rotates in the Y-Axis (based on the orientation of the sensor)
AxisType.ZAXIS: reports the rate of rotation when a GPS Sensor rotates in the Z-Axis (based on the orientation of the sensor)
Example #
# Print gyro rate values from all GPS Sensor axes in a loop
while True:
    brain.screen.clear_screen()
    brain.screen.set_cursor(1, 1)
    brain.screen.print("GPS Gyro Rate - X Axis: ", gps.gyro_rate(AxisType.XAXIS, VelocityUnits.DPS))
    brain.screen.next_row()
    brain.screen.print("GPS Gyro Rate - Y Axis: ", gps.gyro_rate(AxisType.YAXIS, VelocityUnits.DPS))
    brain.screen.next_row()
    brain.screen.print("GPS Gyro Rate - Z Axis: ", gps.gyro_rate(AxisType.ZAXIS, VelocityUnits.DPS))
    brain.screen.next_row()
    wait(0.1, SECONDS)
GPS Heading
GPS Heading #
Reports the heading that a robot is currently facing based on a GPS Sensor's readings from the VEX GPS Field Code.
gps.heading()How To Use #
The gps.heading() command reports a range of heading values from 0.00 to 359.99 degrees, increasing in value when a GPS Sensor is rotated clockwise.
By default, a GPS Sensor should be mounted facing behind a robot. Then, for example, if the GPS Sensor is facing the South wall as defined by the VEX GPS Field Code, the reported heading will be 0.00 degrees, which is the heading that the front of the robot is facing.
Example #
The example below uses the gps.heading() command to stop the Drivetrain's turn when the reported GPS Sensor heading is more than or equal to 180 degrees.
drivetrain.set_turn_velocity(25, PERCENT)
drivetrain.turn(RIGHT)

while gps.heading() < 180:
    wait(5, MSEC)

drivetrain.stop()
GPS Orientation
GPS Orientation #
Reports the angle of the specified orientation axis on a GPS Sensor.
gps.orientation(AXIS, DEGREES)How To Use #
gps.orientation() reports a numerical value representing the angle of rotation about the specified orientation AXIS:
The OrientationType.ROLL axis reports a value between -180 to 180 degrees, representing the angle of a GPS Sensor when tilted left or right
The OrientationType.PITCH axis reports a value between -90 to 90 degrees, representing the angle of a GPS Sensor when tilted forward or backwards
The OrientationType.YAW axis reports a value between -180 to 180 degrees, representing the angle of a GPS Sensor when rotated about the vertical axis
Example #
# Print the orientation of a GPS Sensor's yaw axis in a loop
while True:
    brain.screen.clear_screen()
    brain.screen.set_cursor(1, 1)
    brain.screen.print("GPS Yaw Orientation: ", gps.orientation(OrientationType.YAW, DEGREES))
    wait(0.1, SECONDS)
GPS Signal Quality
GPS Signal Quality #
Reports a GPS Sensor's current signal quality.
gps.quality()How To Use #
The gps.quality() command reports a numerical value representing the current signal quality of a GPS Sensor.
When the reported value is 100, it means that all reported positional and heading data from a GPS Sensor is valid.
However, a reported value of 90 signals that any positional data is no longer being calculated by capturing information from the VEX Field Code, but rather through alternative means.
At 80, only GPS Sensor heading values are valid, but as more time goes by where a GPS Sensor is not scanning enough of the VEX Field Code to accurately determine position and heading information, the reported signal quality will continue to drop until 0, where any GPS Sensor data is effectively frozen and no longer valid.
Example #
# Print a GPS Sensor's signal quality
brain.screen.print("GPS Signal Quality: ", gps.quality())
GPS Set Location
GPS Set Location #
Sets the location for a GPS Sensor to a defined positional value.
gps.set_location(x, y, units, heading, DEGREES)How To Use #
When a GPS Sensor is too close to the field walls to read accurate data (for example, when a robot is in a game's starting position on a field), unexpected behaviors can often occur if the program relies on the GPS's positional and heading data to work correctly.
The gps.set_location() command can be used to set the location and heading of a GPS Sensor if this information is known before the program is ran, which may help reduce GPS data inaccuracies due to a GPS Sensor's proximity to the field walls when a program is started.
The x and y parameters are the X and Y offsets of the GPS Sensor, or a defined origin point on a robot relative to the center of a field. The units parameter can either be MM or INCHES.
The heading parameter is the heading of the robot in its defined position. For example, if the GPS Sensor is mounted facing behind a robot and the robot is facing the West wall (heading of 270), the heading value that should be passed is 270.
# Setting the approximate location of a GPS Sensor
# when a robot is facing West and
# starting at the bottom right corner of a field
gps.set_location(56, -45, INCHES, 270, DEGREES)
GPS Set Origin
GPS Set Origin #
Sets an origin point on a robot at which GPS Sensor positional data should be based upon.
gps.set_origin(X, Y, UNITS)How To Use #
The GPS.set_origin() command can be used to allow GPS positional data to correspond to another point of a robot rather than the location of a GPS Sensor.
It is commonly used when a GPS Sensor is not located on the reference point of a robot (i.e. the point about which a robot rotates). This way, when the origin is set to the reference point, reported positional data would not change when a robot is rotating in-place.
The X parameter takes the X axis (i.e. the axis running through the sides of a GPS Sensor) while the Y parameter takes the Y axis offset distance to a reference point.
Either MM or INCHES are accepted for the UNITS parameter, depending on whether the x and y offset values are being passed as millimeters or inches, respectively.
Example #
# Assuming a GPS Sensor is mounted 25mm forward from the reference point on a robot,
# we can set the origin on the GPS Sensor to have a Y offset of 25

gps.set_origin(0, 25, MM)
GPS X Position
GPS X Position #
Reports the X positional offset of a GPS Sensor or defined origin point from the center of a field.
gps.x_position(UNITS)How To Use #
The gps.x_position() command reports the current X positional offset of the V5 robot's turning reference (midpoint between the two front wheels) relative to the center of a field.
Values can be reported in mm or inches, depending on whether MM or INCHES is passed in the UNITS parameter.
Example #
# Print the current X position
brain.screen.print("GPS X Position (MM): ", gps.x_position(MM))
GPS Y Position
GPS Y Position #
Reports the Y positional offset of a GPS Sensor or defined origin point from the center of a field.
gps.y_position(UNITS)How To Use #
The gps.y_position() command reports the current Y positional offset of the V5 robot's turning reference (midpoint between the two front wheels) relative to the center of a field.
Values can be reported in mm or inches, depending on whether MM or INCHES is passed in the UNITS parameter.
Example #
# Print the current Y position
brain.screen.print("GPS Y Position (MM): ", gps.y_position(MM))
Calibrate Gyro Sensor
Calibrate Gyro Sensor #
Calibrating the Gyro Sensor is used to reduce the amount of drift generated by Gyro Sensor.
gyro.calibrate()Drifting occurs when the Gyro Sensor incorrectly detects movement even though the sensor is not physically moving.
How To Use #
The Gyro Sensor must remain still during the calibration process. The calibration process will take approximately 2 seconds to complete.
Gyro Angle Of Heading
Gyro Angle Of Heading #
Reports the 3-Wire Gyro Sensor's current heading in degrees.
gyro.heading(DEGREES)How To Use #
The command reports an increase in heading when rotating clockwise.
gyro.heading reports a range between 0.00 to 359.99.
Gyro Angle Of Rotation
Gyro Angle Of Rotation #
Reports the 3-Wire Gyro Sensor's current angle of rotation in degrees.
gyro.rotation(DEGREES)How To Use #
Gyro rotation reports a positive value when the Gyro Sensor turns in the clockwise direction.
Gyro rotation reports a negative value when the Gyro Sensor turns in the counter-clockwise direction.
Set Gyro Heading
Set Gyro Heading #
Sets the Gyroscopic (Gyro) Sensor's current heading position to a set value.
gyro.set_heading(HEADING, DEGREES)How To Use #
The set gyro heading command can be used to set the Gyro's position to any clockwise heading.
This command is typically used reset the heading orientation of the Gyro sensor when value is set to 0.
The HEADING parameter accepts a range of 0.0 to 359.99 degrees.
The set heading command can accept decimals, integers, or numeric values.
Set Gyro Rotation
Set Gyro Rotation #
Sets a 3-Wire Gyro Sensor's angle of rotation to a given value.
gyro.set_rotation(ROTATION, DEGREES)How To Use #
The Set Gyro Rotation command can be used to set a 3-Wire Gyro Sensor's angle of rotation to any given positive (clockwise) or negative (counter-clockwise) value.
The Set Gyro Rotation command can accept decimals, integers, or numeric values for its ROTATION parameter.
Inertial Acceleration
Inertial Acceleration #
Reports the acceleration value from one of the axes (x, y, or z) on the Inertial Sensor.
inertial.acceleration(AxisType.XAXIS)How To Use #
Acceleration of reports a range from -4.0 to 4.0 Gs.
Choose which axis to use:
- The X-axis reports acceleration when the Inertial Sensor moves forward to backward
- The Y-axis reports acceleration when the Inertial Sensor moves side to side
- The Z-axis reports acceleration when the Inertial Sensor moves up to down
Calibrate Inertial Sensor
Calibrate Inertial Sensor #
Calibrating the Inertial Sensor is used to reduce the amount of drift generated by the Inertial Sensor.
inertial.calibrate()Drifting occurs when the Inertial Sensor incorrectly detects movement even though the sensor is not physically moving.
How To Use #
The Inertial Sensor must remain still during the calibration process. The calibration process will take approximately 2 seconds to complete.
Inertial Gyro Rate
Inertial Gyro Rate #
Gets the rate of rotation from one of the axes (x, y, or z) on the Inertial Sensor.
inertial.gyro_rate(AxisType.XAXIS, VelocityUnits.DPS)How To Use #
Gyro rate reports a range from -1000.0 to 1000.0 in dps (degrees per second).
Choose which axis to use.
- The X-axis reports rate of rotation when the Inertial Sensor rotates in the X-Axis (based on the orientation of the sensor)
- The Y-axis reports rate of rotation when the Inertial Sensor rotates in the Y-Axis (based on the orientation of the sensor)
- The Z-axis reports rate of rotation when the Inertial Sensor rotates in the Z-Axis (based on the orientation of the sensor)
Inertial Angle Of Heading
Inertial Angle Of Heading #
Reports the V5 Inertial Sensor's current heading in degrees.
inertial.heading(DEGREES)How To Use #
The inertial.heading command reports an increase in heading when rotating clockwise.
inertial.heading reports a range from 0.00 to 359.99 degrees.
Inertial Orientation
Inertial Orientation #
Gets an orientation angle of the inertial sensor. Reports the unit value specified by the parameter of the inertial sensor.
inertial.orientation(OrientationType.ROLL, DEGREES)How To Use #
The orientation reported is determined by the selected axis (x, y, or z).
- The X-axis represents pitch, which reports a value between -90 to +90 degrees.
- The Y-axis represents roll, which reports a value between -180 to +180 degrees)
- The Z-axis represents yaw, which reports a value between -180 to +180 degrees)
Inertial Angle Of Rotation
Inertial Angle Of Rotation #
Reports a V5 Inertial Sensor's current angle of rotation in degrees.
inertial.rotation(DEGREES)How To Use #
The inertial.rotation command reports a positive value when the Inertial Sensor turns in the clockwise direction.
inertial.rotation reports a negative value when the Inertial Sensor turns in the counter-clockwise direction.
Set Inertial Heading
Set Inertial Heading #
Sets the Inertial sensor's current heading position to a set value.
inertial.set_heading(HEADING, DEGREES)How To Use #
inertial.set_heading can be used to set the Inertial Sensor's position to any clockwise heading. This command is typically used to reset the orientation of the Inertial Sensor when the heading is set to a value of 0.
inertial.set_heading is typically used to reset the heading orientation of the Inertial sensor when a value is set to 0.
inertial.set_heading accepts a range of 0.0 to 359.99 degrees.
inertial.set_heading can accept decimals, integers, or numeric values.
Set Inertial Rotation
Set Inertial Rotation #
Sets a V5 Inertial Sensor's angle of rotation to a given value.
inertial.set_rotation(ROTATION, DEGREES)How To Use #
The inertial.set_rotation command can be used to set the inertial sensor's angle of rotation to any given positive (clockwise) or negative (counter-clockwise) value.
inertial.set_rotation accepts a range of any positive or negative decimal or integer.
Light Sensor Brightness
Light Sensor Brightness #
Reports the amount of light detected by the Light Sensor.
light.brightness(PERCENT)How To Use #
light.brightness reports a range from 0% to 100%.
A large amount of light detected will report a high brightness value.
A small amount of light detected will report a low brightness value.
Pressing Limit Switch
Pressing Limit Switch #
Reports if the Limit Switch is currently being pressed.
limit_switch.pressing()How To Use #
Pressing limit reports True if the Limit Switch is being pressed.
Pressing limit reports False if the Limit Switch is not being pressed.
Line Tracker Reflectivity
Line Tracker Reflectivity #
Reports the amount of light reflected using the Line Tracker sensor.
line_tracker.reflectivity(PERCENT)How To Use #
Light-colored surfaces will reflect more light and will report a high reflectivity value.
Dark-colored surfaces will reflect less light and will report a low reflectivity value.
The default unit is PERCENT that returns an integer value from 0% to 100%.
Motor Current
Motor Current #
Reports the amount of current a V5 Smart Motor or Motor Group is using in amperes (amps).
motor.current(CurrentUnits.AMP)How To Use #
Motor current reports a range from 0.0 to 2.5 amps.
Motor Efficiency
Motor Efficiency #
Reports the efficiency of a V5 Smart Motor or the first motor of a Motor Group.
motor.efficiency(PERCENT)How To Use #
Efficiency of motor reports the value of the power (in watts) the Motor or Motor Group is using (input), versus the amount of power (in watts) the Motor or Motor Group is providing (output).
A V5 Smart Motor or Motor Group typically reaches a maximum efficiency of 65% under normal use cases.
Efficiency of motor reports a range from 0% to 100%.
Motor Is Done
Motor Is Done #
Reports if the selected V5 Smart Motor or Motor Group has completed its movement.
motor.is_done()How To Use #
Motor is done reports True when the selected Motor or Motor Group has completed its movement.
Motor is done reports False when the selected Motor or Motor Group is still moving.
Motor Is Spinning
Motor Is Spinning #
Reports if the selected V5 Smart Motor or Motor Group is currently spinning.
motor.is_spinning()How To Use #
Motor is spinning reports True when the selected Motor or Motor Group is still moving.
Motor is spinning reports False when the selected Motor or Motor Group is stopped.
Motor Position
Motor Position #
Reports the current rotational position of the selected V5 Smart Motor or the first motor of the specified Motor Group.
motor.position(UNIT)How To Use #
Motor position reports the position of the V5 Smart Motor or the first motor in a Motor Group in integer numbers for degrees, and decimal numbers for turns.
Acceptable values for UNIT are: DEGREES or TURNS.
Motor Power
Motor Power #
Reports the amount of power output a V5 Smart Motor or the first motor of a Motor Group is currently generating.
motor.power(PowerUnits.WATT)How To Use #
Motor power reports a range from 0.0 to 11.0 watts.
Motor Temperature
Motor Temperature #
Reports the temperature of a V5 Smart Motor or the first motor in a Motor Group.
motor.temperature(PERCENT)How To Use #
Using the temperature command can help users develop logic to keep their V5 Smart Motors or Motor Groups from overheating during heavy use.
Motor temperature reports a range from 0% to 100%.
Motor Torque
Motor Torque #
Reports the amount of torque (rotational force) a V5 Smart Motor or the first motor of a Motor Group is currently using.
motor.torque(UNITS)How To Use #
motor.torque reports a range from 0.0 to 18.6 inch-pounds (InLB) if the provided UNITS parameter is TorqueUnits.INLB.
Alternatively, a range from 0.0 to 2.1 Newton-meters (Nm) is reported if the provided UNITS parameter is TorqueUnits.NM.
Motor Velocity
Motor Velocity #
Reports the current velocity of a V5 Smart Motor or the first motor of a Motor Group.
motor.velocity(UNITS)How To Use #
Motor velocity reports a range from -100% to 100% or -600rpm to 600rpm.
Acceptable values for UNIT parameter are: PERCENT or RPM.
Motor velocity will report a "rotations per minute" range based on the Gear Cartridge installed in a V5 Smart Motor or the first motor of a Motor Group.
- Red Cartridge: -100rpm to 100rpm
- Green Cartridge: -200rpm to 200rpm
- Blue Cartridge: -600rpm to 600rpm
Optical Brightness
Optical Brightness #
Reports the amount of light detected by the Optical Sensor.
optical.brightness()How To Use #
optical.brightness() reports a range from 0% to 100%
A large amount of light detected will report a high brightness value.
A small amount of light detected will report a low brightness value.
Optical Color Detection
Optical Color Detection #
Reports the color that the Optical Sensor is detecting.
optical.color()How To Use #
optical.color() will return a RGB (Red, Green, Blue) value that corresponds to a color. You can use the Color enums to compare to the value returned by optical.color()
You can compare to the following values
- Color.BLACK
- Color.WHITE
- Color.RED
- Color.GREEN
- Color.BLUE
- Color.YELLOW
- Color.ORANGE
- Color.PURPLE
- Color.CYAN
You can use these in a conditional statement like this:
if optical.color() == Color.RED:
    brain.screen.print("Red Object")
Optical Gesture Disable
Optical Gesture Disable #
Sets a V5 Optical Sensor to detect colors.
optical.gesture_disable()How To Use #
The Optical Gesture Disable command allows you to set a V5 Optical Sensor to detect colors.
By default, a V5 Optical Sensor will be set to detect colors.
Example #
The example shows how to correctly set a V5 Optical Sensor to detect colors after checking for gestures.
# Detect gestures
optical.gesture_enable()
while optical.get_gesture().type != GestureType.UP:
    wait(0.1, SECONDS)
brain.screen.print("Up!")

wait(1, SECONDS)

# Detect colors
optical.gesture_disable()
while True:
    brain.screen.clear_screen()
    brain.screen.set_cursor(1, 1)
    if optical.color() == Color.RED:
        brain.screen.print("Red Object!")
    else:
        brain.screen.print("Not Red Object!")
    wait(0.02, SECONDS)
Optical Gesture Enable
Optical Gesture Enable #
Sets a V5 Optical Sensor to detect gestures.
optical.gesture_enable()How To Use #
The Optical Gesture Enable command allows you to set a V5 Optical Sensor to detect gestures.
By default, a V5 Optical Sensor will be set to detect colors.
Before using any V5 Optical Sensor gesture commands, a V5 Optical Sensor must be correctly set to detect gestures.
Example #
The example shows how to correctly set a V5 Optical Sensor to detect gestures before checking for gestures.
optical.gesture_enable()
while optical.get_gesture().type != GestureType.UP:
    wait(0.1, SECONDS)
brain.screen.print("Up!")
Optical Gesture Detected
Optical Gesture Detected #
Reports detected gesture data from a V5 Optical Sensor.
optical.get_gesture()How To Use #
The Optical Gesture Detected command returns an object with gesture information. To check the type of the detected gesture, access the type property on the returned object.
optical.get_gesture().typeBefore using any V5 Optical Sensor gesture commands, a V5 Optical Sensor must be correctly set to detect gestures with the optical.gesture_enable() command.
Below are the gestures that a V5 Optical Sensor can detect:
GestureType.UPGestureType.DOWNGestureType.LEFTGestureType.RIGHT
Example #
The example shows how to correctly set a V5 Optical Sensor to detect gestures before checking for gestures.
optical.gesture_enable()
while optical.get_gesture().type != GestureType.UP:
    wait(0.1, SECONDS)
brain.screen.print("Up!")
Optical Hue
Optical Hue #
Reports the hue of the color of an object.
optical.hue()How To Use #
optical.hue() reports a number value that is the hue of the color of an object.
It returns a number between 0 and 359, which can be thought of as the location of the color on a color wheel.
Optical Near Object
Optical Near Object #
Reports if the Optical Sensor detects an object close to it.
optical.is_near_object()How To Use #
optical.is_near_object() reports True if an object is close enough to the Optical Sensor to get other sensing information.
optical.is_near_object() reports False if an object is not close enough to the Optical Sensor to get accurate sensor readings.
Set Optical Light
Set Optical Light #
Sets the light on the Optical Sensor to on or off.
optical.set_light(LedStateType.ON)How To Use #
optical.set_light(LedStateType.ON) allows you to turn the Optical Sensor's light on or off. The light lets the sensor see objects if it is looking at an object in a dark area.
To turn the light on you pass LedStateType.ON
optical.set_light(LedStateType.ON)
To turn the light off you pass LedStateType.OFF
optical.set_light(LedStateType.OFF)
Set Optical Light Power
Set Optical Light Power #
Sets the light power of V5 Optical sensor.
optical.set_light_power(50, PERCENT)How To Use #
optical.set_light_power(50, PERCENT) will change the brightness of the light on the Optical Sensor.
The command accepts a range of 0% to 100% for the intensity, and PERCENT as the unit. If the light is off, this command will turn the light on.
Potentiometer Angle
Potentiometer Angle #
Returns the angular position of the Potentiometer.
potentiometer.angle(UNITS)How To Use #
potentiometer.angle returns a decimal value to report the angular position of the Potentiometer.
The UNITS parameter accepts either DEGREES or PERCENT as an argument.
If the provided UNITS is in DEGREES, the range of returned values will be from 0.0 to 250.0 degrees for a V5 Potentiometer, and from 0.0 to 330.0 degrees for a V5 Potentiometer V2.
Alternatively, the returned values will range from 0 to 100% if the provided UNITS is in PERCENT.
Distance From Range Finder
Distance From Range Finder #
Reports the distance of the nearest object from the Ultrasonic Range Finder sensor.
range_finder.distance(UNITS)How To Use #
Distance from reports a range from 30mm to 3000mm or 2 inches to 115 inches.
The UNITS parameter accepts either MM or INCHES as a value.
Range Finder Found Object
Range Finder Found Object #
Reports if the Ultrasonic Range Finder sensor detects an object within its field of view.
range_finder.found_object()How To Use #
Object found reports True when the Ultrasonic Range Finder sensor sees an object or surface within its field of view.
Object found reports False when the Ultrasonic Range Finder sensor does not detect an object or surface.
Controller Enabled
Controller Enabled #
Enables or disables Controller-configured actions from the Devices menu.
remote_control_code_enabled = FalseHow To Use #
Choose to either enable or disable the configured Controller actions.
By default, the Controller is Enabled in every project.
Rotation Angle
Rotation Angle #
Returns the angular position of a Rotation Sensor.
rotation.angle()How To Use #
rotation.angle() returns a decimal value with the current angular position of a Rotation Sensor in degrees.
Rotation Position
Rotation Position #
Reports the current rotational position of a Rotation Sensor.
rotation.position(UNIT)How To Use #
rotation.position(UNIT) reports the position of a Rotation Sensor in integer numbers for degrees, and decimal numbers for turns.
Acceptable values for UNIT are: DEGREES or TURNS.
Set Rotation Position
Set Rotation Position #
Sets a Rotation Sensor's position to the given value.
rotation.set_position(0, DEGREES)How To Use #
rotation.set_position(0, DEGREES) can be used to set a Rotation Sensor to a given positional value.
Usually, rotation.set_position(0, DEGREES) will be used to reset a Rotation Sensor to 0 degrees.
Rotation Velocity
Rotation Velocity #
Reports the current velocity of a Rotation Sensor.
rotation.velocity(UNIT)How To Use #
rotation.velocity(UNIT) will return the velocity of a Rotation Sensor in the UNIT that is passed.
Acceptable values for the UNIT parameter are:
- VelocityUnits.RPM
- VelocityUnits.DPS
Largest Object
Largest Object #
Reports information about the largest detected object from the Vision Sensor.
vision.largest_object()How To Use #
Configure the Vision Sensor by adding signatures / codes.
A call to the vision.take_snapshot command is then required to capture an image in the Vision Sensor prior to using the vision.largest_object command.
The example below will print some information about a detected object onto the V5 Brain's screen.
while True:
    brain.screen.clear_screen()
    brain.screen.set_cursor(1, 1)

    # Take a snapshot with the Vision Sensor with the specified signature and store the object data into a variable
    vision_object = vision.take_snapshot(signature)

    # Check the variable to see if a valid object was detected when the snapshot was captured
    # If yes, print the data
    if vision_object is not None:
        brain.screen.print("Center X: ", vision.largest_object().centerX)
        brain.screen.next_row()

        brain.screen.print("Center Y: ", vision.largest_object().centerY)
        brain.screen.next_row()

        # Take a new snapshot every 0.2 seconds
        wait(0.2, SECONDS)
    else:
        brain.screen.print("No Object Detected")
The following is a list of properties that can be accessed on the object returned by the vision.largest_object command:
id- A unique ID assigned to each object by the Vision SensororiginX- The top left X position of the objectoriginY- The top left Y position of the objectcenterX- The center X position of the objectcenterY- The center Y position of the objectwidth- The width of the objectheight- The height of the objectangle- The angle of the objectexists- If the Vision Sensor detects the object or not
Snapshot
Snapshot #
Takes a snapshot from the Vision Sensor.
vision.take_snapshot(SIGNATURE)How To Use #
The snapshot command will capture the current image from the Vision Sensor to be processed and analyzed for color signatures and codes.
Typically, a snapshot is required first before using any other Vision Sensor commands.
Variables #
2D List Variable
2D List Variable #
2D list variables are used to store lists with multiple rows and columns.
How To Use #
To create a 2D list variable, create a unique and meaningful variable name. This means that the variable name should accurately describe the nature of its values.
For example, a 2D list variable name coordinates can be used to store multiple sets of coordinate values.
Declare this list using a single equal symbol = after your list name followed by square brackets [ ].
Inside these square brackets, insert multiple sets of square brackets, separated by a comma, like so: [[ ], [ ]]. More than two sets of square brackets can be nested within the outer-most set of square brackets.
Include values that are separated with a comma or , in their respective brackets. If the variable is storing strings, place the comma outside of the enclosing " ".
Each inner set of brackets represents a row of list items. The index of the item within the row represents a column of the 2D list.
To access the value of within a 2D list, use the name of the list, immediately followed by two indexes enclosed in square brackets. The first index references the row, while the second index references the column in the 2D list. Keep in mind that array indexes begin at 0, not 1.
For example, given a 2D list coordinates = [[X1, Y1], [X2, Y2]], the expression coordinates[0][0] will return X1.
Example 1 #
This example shows a variable called my_list being assigned two separate lists of colors.
my_list = [["Green", "Red", "Blue"], ["Black", "Yellow", "Orange"]]Example 2 #
This example shows a variable called my_list being assigned two separate lists of numbers.
my_list = [[1, 2, 3], [4, 5, 6]]Boolean Variable
Boolean Variable #
Boolean variables can hold either True or False values.
How To Use #
To create a boolean variable, create a unique and meaningful variable name. This means that the name of the variable should accurately describe the value that it is storing.
For example, a variable pressed should be used to store the value of whether a button is pressed.
Declare this variable with a equal symbol = following the Boolean name. Its value can either be True or False.
Example #
This example assigns a value True to my_variable .
my_variable = TrueList Variable
List Variable #
List variables are used to store multiple values.
How To Use #
To create a list variable, create a meaningful variable name. This means that the variable name should accurately describe the nature of its values.
For example, a list variable colors can be used to store multiple color values.
To assign a list of values to a list variable, use the = operator, followed by comma-separated values enclosed in a set of square brackets, [ ].
If the values are numbers, the separating commas should come right after each value.
my_number_list = [1, 2, 3]
If the values are strings, the commas should go outside of the " ".
my_string_list = ["Hello", "World"]
To access a specific value in the list variable, enter the name of the list variable, immediately followed by an index enclosed by a set of square brackets. Keep in mind that the index of an array starts at 0, not 1.
For example, my_string_list[0] will return the value "Hello".
Example 1 #
This example shows a variable called my_list being assigned the string values of several colors.
my_list = ["Green", "Red", "Blue"]Example 2 #
This example shows a variable called my_list being assigned several numbers.
my_list = [1, 2, 3]Numeric Variable
Numeric Variable #
Numeric variables are used to store numerical values.
How To Use #
To create a numeric variable, create a meaningful variable name. This means that the variable name should accurately describe the value that it is storing.
For example, a variable counter should be used to store the value of a counter.
To assign a value to the variable, use the = operator.
Example 1 #
This example keeps the default variable name my_number and assigns it a value of 10.
my_number = 10Example 2 #
This example gives the variable the name three_plus_two and stores the result of the 3 added to 2.
three_plus_two = 3 + 2String Variable
String Variable #
String variables are used to store strings.
How To Use #
To create a string variable, create a meaningful variable name. This means that the variable name should accurately describe its value.
For example, a variable name should be used to store the value of a name.
To assign a string to a string variable, use the = operator. It's string value can be enclosed in either " " or ' '.
Example #
This example shows a variable called my_string being assigned the string value "Hello".
my_string = "Hello"VR #
VR Thread
VR Thread #
The VR Thread function must be used to call functions at the global level of the program. It can be used to start threads to run simultaneously.
vr_thread(function_name)Notice that the function name is passed as a reference to the vr_thread() call rather than calling the function inside a VR Thread such as vr_thread(function_name()).
How To Use #
You can take any function you have in the program and pass its reference to vr_thread() on the global scope. Using VR Threads are necessary in order for multiple functions to run in parallel.
The functions will, in general, execute in the order that they are passed into vr_thread() calls. If a function is waiting for a command to complete, it will pass program execution to another function, and resume its execution when the other function finishes running, or is also waiting for a command to complete.
The functions that causes threads to switch program execution:
drivetrain.drive_for(FORWARD, 200, MM, wait=True)
drivetrain.turn_for(RIGHT, 90, DEGREES, wait=True)
drivetrain.turn_to_heading(90, DEGREES, wait=TRUE)
drivetrain.turn_to_rotation(90, DEGREES, wait=TRUE)
drivetrain.set_heading(0, DEGREES)
drivetrain.set_rotation(0, DEGREES)
wait(1, SECONDS)

Any user-created function
Example 1 #
We make a single function that is executed in the global scope with vr_thread(). The move_drivetrain() function will make the robot move 200 mm and then print when it is done.
def move_drivetrain():
    drivetrain.drive_for(FORWARD, 200, MM)
    brain.screen.print("Done moving")
    brain.screen.next_row()

vr_thread(move_drivetrain)
Example 2 #
Now we added the lower_fork() function. This will move the fork down and print a message when the fork is fully lowered.
We make the call vr_thread(lower_fork) after the vr_thread(move_drivetrain) call. However, because drivetrain.drive_for(FORWARD, 500, MM) makes the thread wait, it will switch program execution over to the lower_fork function, which will start lowering the fork before the drivetrain completes its movements.
def move_drivetrain():
    drivetrain.drive_for(FORWARD, 500, MM)
    brain.screen.print("Done moving")
    brain.screen.next_row()

def lower_fork():
    fork_motor_group.spin_for(FORWARD, 1700, DEGREES)
    brain.screen.print("Fork lowered")
    brain.screen.next_row()

vr_thread(move_drivetrain)
vr_thread(lower_fork)